Writing Entries
Anatomy of an entry
An entry is an editable text file rendered into various elements in a webpage. Check The Avocado Lab entry as an example of how a file is rendered into a webpage
Sections of a File
Basically the file has two sections:
- the front matter is between two lines of three dashes
---representing datasets in simplekey: valuepairs written in YAML (Learn yml)
---
key: value
list:
  - one
  - two
map:
  first: 1
  last: 9
---
- the markdown text contains the description, photos and other content of the entry written in simple Markdown (Learn md)
# Heading 1
Text with *italics*, and **bold**. [Link](http://elsewhere.com)

## Heading 2
- List
You can use the simple entry template or the complete template
Elements in a webpage
The rendered webpage can have several elements taken from the front matter or rendered automatically. Below is an image of the Avocado Lab.
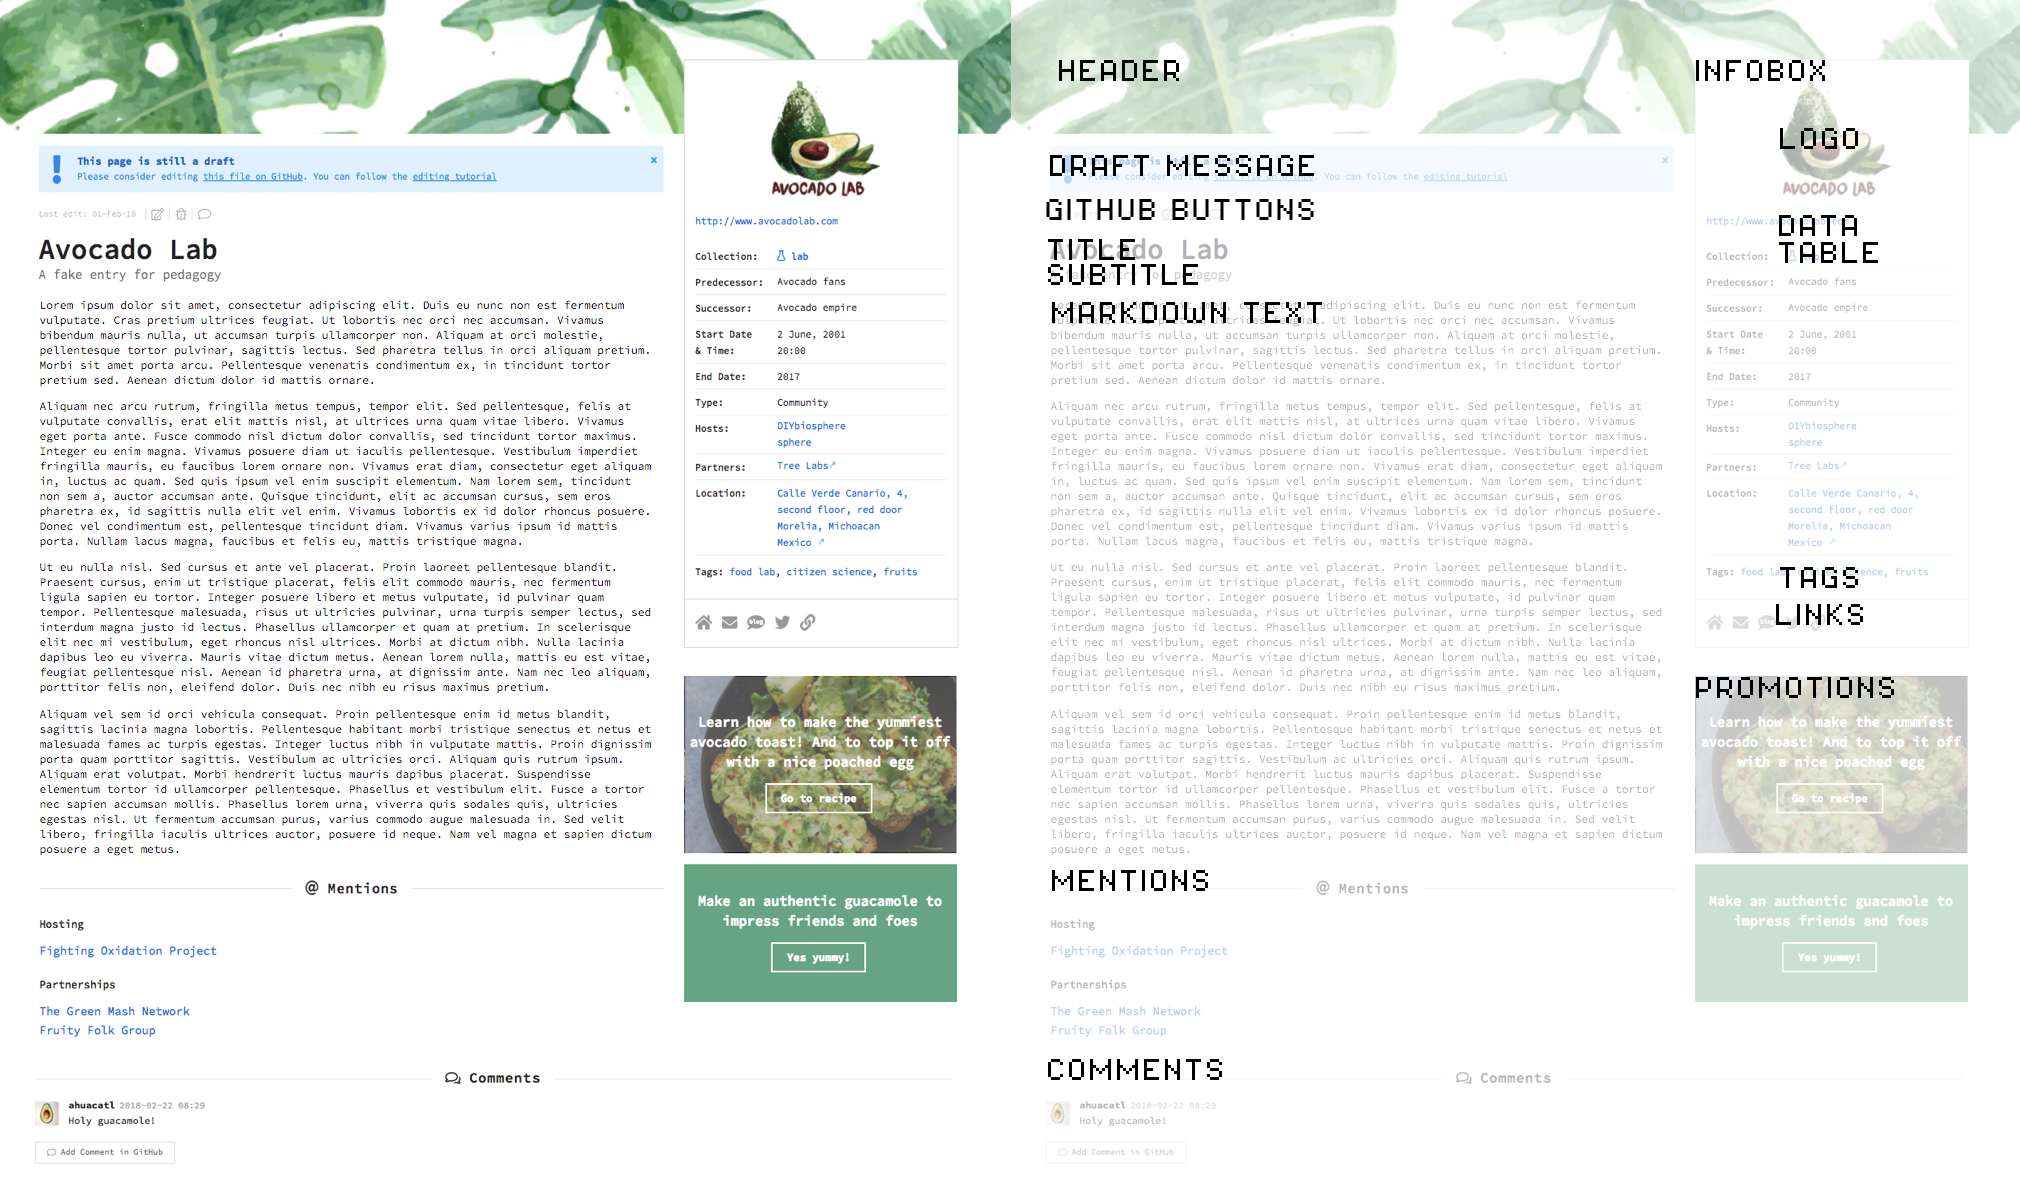
Infobox
A box on the right hand side of the entry, or at top in mobile view. It shows comparable data across all entries. The most outstanding parts are the logo and the data table
Logo
There are three ways to render the logo: (1) Add image file to the folder of your initiative in the repository with the name logo. (2) add the image path in the repository or (3) the external URL. Image format must be strictly: .png, .jpg, or .svg
Data Table
The current data variables that are mandatory are:
title: # Name of initiative
website: # Main external website with more information
start-date: #ISO format: 'YYYY-MM-DD hh:mm', 'YYYY-MM-DD', 'YYYY-MM', or 'YYYY'
type-org: # type is the social/legal organization, e.g.: company, university, museum, community, local government, etc.
country: # country name in english
If applicable, the following data variables are also available
subtitle: # Short description. 200 characters max!
predecessor: # the previous name of the entry
successor: # the initiative that evolved from the initiative
end-date: # ISO format: 'YYYY-MM-DD hh:mm', 'YYYY-MM-DD', 'YYYY-MM', or 'YYYY'
status: # AUTOMATIC!! 'active' by default, unless `end-date` in the past then 'inactive', or unless `start-date` in future then 'planned'. Useful when it is neither 'active', 'inactive', or 'planned'
hosts: # Is the space or organization behind the initiative, e.g. a university or a makerspace
  -  # host. Use the exact 'title' of another entry to automatically display as a linked item
  - # another host
partners: # collaborators, partners, or affiliations worth mentioning
  -  # partner. If rendering a markdown link wrap in "" or ''
  - # another partner
address: # street and number
directions: # specific directions to find location
city: # city name in english
state: # state, province, canton name in english
country: # country name in english
_geoloc: # Geolocation coordinates for mapping
  lat: # latitude number
  lng: # longitude number
Tags
Are used as keywords to easily categorize entries. A good rule of thumb is to have maximum 10 tags. In addition, it is good practice to search the current tags used by other entries and reuse them if applicable.
tags:
  - # tag
  - # another tag
Links
Links to any kind of website, social media, or contact information can be presented here.
Website
The website renders twice. Once at the top of the infobox, under the logo, and on the bottom along with the brand icons as: website:
Brand icons
These are presently available:
email:
| mailing-list:
| rss:
| blog blog:
| medium:
| tumblr:
| forum:
| facebook:
| facebook-group:
| github:
| gitlab:
| bitbucket:
| twitter:
| google-plus:
| google-group:
| instagram:
| flickr:
| vimeo:
| youtube:
| slack:
| gitter:
| rocketchat:
| trello:
| dropbox:
| google-drive:
| wiki wiki:
| linkedin:
| angellist:
| meetup:
| pinterest:
| kickstarter:
| patreon:
| paypal:
Link icon
For adding a link that doesn’t have an icon (maybe just yet) and it renders as:
links:
  - URL: # URL to external link
    tooltip: # when mouse hovers, what the pop over tool tip will say
  - URL: # Adding more link icons
    tooltip:
Promotion boxes
Promotions are boxed items below the the infobox, or below the markdown text in mobile. Here you can promote whatever you want, your meetups, classes, to join the project, etc. You can add as many as you want, but a good rule of thumb is no more than 3.
To add a promotion you must write in the front matter:
promotions:
  - text: # write here your promotion
    button: # text in the button
    URL: # link for the button
    image: # path to the image in the background
  - text: # second promotion starts with another dash
    button:
    URL:
    color: #specify a background color instead of an image. wrap the color in '', e.g. '#43BB7A'
The rendered box will first try to grab the promotions.image key, then the promotions.color key. If these are not specified the background color will be grey.
Header image
To display a header image at the top of your entry, you can either save an image in the folder of your initiative with the name ‘header’ in .png, .jpg or .svg format, or add the header: key in the front matter with a link to the image, e.g. header: http://linktoheaderimage.jpg. This is the same as the logo
Draft message
To display a draft message at the top, just add to the front matter:
draft: true
GitHub Buttons
This section is rendered automatically, showing the last date of editing.
- redirects to the github file for editing
- if it exists, redirects to the github issue to discuss editing in the diybiosphere/sphere repository, if not, then to create a new one.
- if it exists, redirects to the github issue for comments in the diybiosphere/comments repository, if not, then to create a new one
Title and subtitle
The subtitle is a short description, or a tag line of max 200 characters.
The title is the name of your entry. If you were ever to change it, keep in mind that it might be mentioned by other entries (see below). To check, go to the repository and search for the current name of the entry. If it is mentioned in the front matter of other files, consider changing it in those files as well.
Markdown text
The main content of the entry. Write whatever seems pertinent to the entry. Add tables, images, titles, etc.
Wiki-style links
It is possible to have internal wiki-style links that are automatically generated by wrapping it in brackets. To do so, you must edit the _references.md file y the sphere repository and add something like:
[Avocado Lab]: /docs/tutorials/AvocadoLab/
So when you write:
-
[Avocado Lab]renders => Avocado Lab -
[go to Avocado Lab entry][Avocado Lab]renders => go to Avocado Lab entry
Formatting elements
To format an image, table, etc., add {:.class} after the element. The Semantic-UI framework makes formatting easy.
![]()
{:.ui.small.bordered.image}
Labeled media
Adding a video or an image with a caption is easy using the following code and filling in media= with either "video" or "image"; class= for size and position mainly, path=, and label= (i.e. substituting the red text)
{% include elements/labeled-media.html media="video" class="medium centered" path="/assets/videos/add-entry-users.mp4" label="TThis is a label" %}
This is a label
Creative Commons Images

All Content Contributed to DIYbiosphere is dedicated to the public domain (see our Terms of Use). Contributions that are shared/uploaded should explicitly note their copyright terms if the author(s) do not waive authorship as per our Contributor Terms.
Works licensed under the Creative Commons can be included in Contributions but must note their copyright using the following element and filling in class= for size and position,path=,license=, and sourceURL= (i.e. substituting the red text)
{% include elements/cc-image.html class="medium right floated" path="/docs/tutorials/AvocadoLab/AvocadoLab-header.png" license="by-nc" sourceURL="https://www.freepik.com/free-vector/hand-painted-green-leaves-pack_832587.htm#term=tropical%20leaves&page=1&position=3" %}
Mentions
When another entry mentions by title: another entry either in partners: or hosts: it is automatically showed in this section. This way entries can show how other entries connect to them, even if they don’t state it explicitly.
Comments
Are rendered from comments of a GitHub Issue in the diybiosphere/comments repository. To enable them in the webpage:
- Open a GitHub Issue in the diybiosphere/comments repo
- Title the issue with the same
title:of the entry - Open
_data/entry_issue.ymlfrom diybiosphere/sphere repository. - Add the following to the file:
- page_title: # Title of page (exactly)
  comments_issue: # issue number of comments in diybiosphere/comments repo
  edit_issue: # issue number discussing editing in diybiosphere/sphere repo
- Commit and wait for Travis to build (may take a few minutes)